Showing posts with label Brandon. Show all posts

Saturday, January 4, 2014

January Play Dates Scrapbooking Class | ProPlayer


Play Dates | Pro Player
This month I've got game. No, really! I just made 4 super layouts from the ProPlayer My Reflections Paper packet (just $9.95 plus tax and shipping) plus a few extra cardstock sheets (okay, and one Creme Brulee B&T leftover from my retired Veranda paper packet because I ran out of CS...) These paper packets are a seriously amazing deal!

Close To My Heart has always come up with terrific trendsetting supplies and artwork and hasn't failed here. Listen, ladies, even if you are put off by the decidedly masculine colors because you need GIRL stuff.. never fear! This paper works for your favorite team: Team You! Whether you've got Little League, Super Bowl, or Gamers in mind, this is a great package to cover the Big Day. (Detail closeups of L1 below).


"Non stop fun" is from Later Sk8r and worked again for my missing  Complements My Stickease.
"Adventure Time" is on the zip strip!

Here's a closeup of my borrowed Veranda Creme Brulee' B&T.

I went with the two WOTG layout patterns to showcase a training session for work at one of our local air ambulances, AirMed (Layout one, L1, above), and for my boys who love playing with their dump trucks inside and out (L2, below).

Stamps are from Later Sk8r (retired), Fast and Furious and the Cricut Artbooking stamps,
plus April's SOTM (also retired). Journalling will go on White Daisy CS strips in the middle black portion.
ffffffffffffffffffffffffffffffffffffffffffffffffffffffffff
I stamped the dumptruck first in black, then on a White Daisy CS sheet in Creme Brulee, and I cut out the dump to overlay with a little 3D Foam Tape.


The third was inspired by my friend, Karen Pedersen (L3, below). Red and blue are my son's favorite colors and they fit so perfectly with pictures I took of his recent broken arm (Merry Christmas) and seemed to embody his whole attitude about the experience, perseverance and accomplishment. Game on!

Layout3
The title is made from a retired alphabet, but the Complements have a similar title design.

Sometimes we must make do! I didn't have any ruby shimmer trim, so I cut some Ruby CS and
added red Glitz glitter gel over the top. Nothin' wrong with using what ya got!
L3 detail
This sentiment is from Later Sk8r (retired) and was perfect!
I also put together a 4th layout with the scraps and 2 slate CS sheets for the traditional "Gamers" in our home, Brandon and the "Wii" little ones, the exact theme of the ProPlayer pack. And the layout is straight out of Make It From Your Heart, Vol. 1. Easy peasy!


I just love pennants! To keep your Ruby Chevron ribbon from fraying after you cut it, just run a thin line
 of Liquid Glass along the cut edge and let dry a few minutes.

Pop up your title with a little 3D Foam Tape.

These clear squares are from the retired Clear Windows, we used to carry,
many a moon ago when I started with Close To My Heart. They seemed to add the
right accessory and shape with this paper and super-clean layout pattern.

Journal tag and pocket "secured" with twine to match the other embellishments.
You can make these layouts with just a few basic supplies next month. Get started with the Basic Kit now ($29.95 plus tax and shipping) and Happy Scrappin!

Warm wishes,

Friday, November 22, 2013

Week In The Life | Thursday Photos + Words

Well. It's getting to mid-point and I am having a hard time writing things down and taking pictures. I can't believe how much harder this is from the last time I did WITL. Life gets in the way which is the story of mine. Oh well.


Garage is finished (mostly).


Most of Brook's homework is online this year. She is part of a pilot program at her school where she has to go to several websites linked through a main online suite and upload her homework assignments into a chat where she can post discussions. It reminds me of college. My how things have changed.
 

At her Activity Days program with our church, Brook learned about babysitting. She didn't want to go to this one because she felt she already knew all she ever wanted to about the subject. After getting a bag full of games and entertainment for the "kids", she was glad she did and got started right in with reading to Garrett.
 

Brook's planner, today.
Warm wishes,

Monday, May 13, 2013

Morton Update | Mother's Day Card

First, thanks for staying with me the past few years, and following my blog! We've been mighty hectic around here (really, since Colt was born) and I've had a hard time setting things down and crafting, let alone sharing any of it.

Here's what you'll find, today:
1. Mother's Day
2. Morton Update
3. Mom's Card - tutorial

1. Mother's Day
I'm kind of proud of myself. I'll tell you why in a sec. For Mother's Day, my family really gave me the royal treatment! I got to prop my feet up while they cleaned the whole house top to bottom (waxed floors and polished the wood railings, even!) I received chocolate, handmade gifts, and a wonderful home-cooked meal and I didn't have to do the dishes! While they worked like slaves, I used my time wisely. This is the proud part. I got a rare opportunity to craft for several hours while they cleaned and cooked. I was able to accomplish quite a bit during that short time and crafted some last minute gifts for others. I'll share one with you today, and yippee! I have a few more to share this month, too. I hope you had an amazing Mother's Day with your friends and family as well!


2. Morton Update
Before I go on about my cute little family, I want to remind you that during May, with your $35 purchase, you can still pick up a Dream Pop paper packet for National Scrapbooking Month for only $10. It's super cute and fun and just right to perk up your day! Pick it up here. Okay, now on to the fun stuff! We just returned home from four-wheeling in Delta, UT. Delta, you say? Yes, I was a bit skeptical as well, but, turns out, Delta has some really interesting sites and we had a great time. If you're from Delta, I commend you on your beautiful town and hospitality! Some of the places we saw:

Topaz Japanese Relocation Camp
Notch Peak
Painter Springs


Hermit's cabin

Lehman Caves
Brandon and I have been just plugging along and the vacation was much overdue. It was great to get out of the valley and roast s'mores with family and friends! The kids are all doing well, looking forward to summer. We got a tramp recently, so they've been enjoying their status as VIPs in the neighborhood :)

3. Mom's Card (one of them - Moms, that is)
This was a bit unconventional for a Mother's Day card. I had been cutting earlier for a project later this week for Moms and daughters at my church and became fascinated by the negative space created from the items cut out on my Cricut. I kept thinking, this would make a fabulous card in Slate and Honey! So this is what developed. I loved spending time just puttering around on the Cricut. Just seeing what inspiration came and following through; putting several projects together. Priceless. Thank you family.

This 6x6" card features a Slate base and 3 layers of Honey cardstock over the top, black 1" grosgrain ribbon and 2 Ruby cardstock roses, inked with Slate. Below is a quick tutorial on how I got the pattern.

1. I had 3 sheets of negatives left from cutting pinwheels out of Honey cardstock. The pinwheels were cut using the Close To My Heart Artiste cartridge (pg. 50, "p" key using Accent 1) sized at 3 1/4" and the Auto Fill feature, which produced 9 per sheet.
2. Flip the bottom diagonally, from the top right corner to the bottom left corner, keeping the top left corner where the pattern is closest to both edges.
 3. Ok, set the top sheet off to the side, keeping track of how you set it. Take the middle sheet and rotate a quarter turn to the right.
4. Now, hold up that third top sheet which you set aside and rotate that one a half turn to the right. And there's your pattern.
 5. Ok, now to tack them together quick-and-easy-like, grab your favorite spray adhesive. This is from Wally's. And something to use as a drop cloth. The lid of a paper box works great in keeping overspray to a minimum while fitting a full 12x12" sheet.
6. Now, separate the layers, keeping the positioning, and spray the backs of the cardstock sheets (so your adhesive doesn't show through if you miss), one at a time and carefully re-stack the sheets and press together to secure. Now you have your overlay for your card. It's still tacky on the bottom due to the previous spray adhesive, so just center over your card base where you like and press down, then trim.

7. Attach ribbon and then roses, which were also cut from the Artiste cartridge (pg. 54, "f" key using Accent 1, at 5" and 3"). Tip, use this handy tool to form your roses and zip these out in record time.

Warm wishes for a great spring day!


Monday, December 31, 2012

Christmas Firsts | Overstamping Technique


Phew! I am grateful to be back in the blogosphere after a wonderful Christmas holiday with my family. It's been a crazy whirlwind and as usual I overbooked myself on too many projects and didn't get half of them finished...and enjoyed every minute with my family doing what we loved. I can live with that.

Here's a look at one project I was able to finish this week. It took me all week, because despite the Cricut being super fast and easy, it is kind of loud next to the sleeping baby's room... I get my crafting done after the kids are down for the count at night, so I have to pre-plan my Cricut cutting times so I can do those on the weekend during the day. When I just sit down to mess around and inspiration strikes...well, it sometimes takes a while to try it all out!

Title using the Overstamping technique in Champagne and Cranberry inks. Love this.
Overstamping

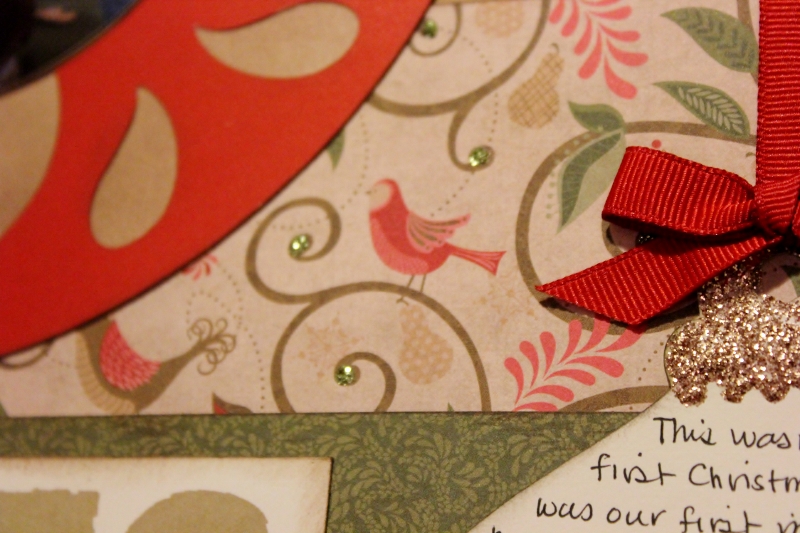
All of the ornaments were cut with the Cricut Artiste cartridge. For the large Cranberry ornament, I cut the base in Champagne cardstock at 8" and then the overlay in cranberry, also at 8", matching the layout instructions in Jeanette Lynton's Magic for the Makin' It Happen layout. The ornament for my journalling was cut from Colonial White cardstock, then I embellished with Almond Glitz Gel, letting it dry a few minutes, then added journalling and some old Cranberry grosgrain for trim. I love how the Almond and Bronze glitter appears to change colors based on what is around it. The glitter on the large Cranberry ornament and the Colonial White journal spot are the same, but they appear different on the two colors of cardstock.
Journalling Spot Detail

Green, Red and Almond decorative Glitz Glitter Gel detail.
Just loving this Glitz Glitter Gel! I added dots of Green all over the swirls on the Pear and Partridge B&T. It's Christmas!
The blur of white behind the shoe in the first picture on the Cranberry ornament is a bit unusual, I realize. It was long before I worried much about taking pictures with scrapbook layouts in mind. Meet Raynie. This is the first layout I have done of her since she passed, my sweet baby girl and first "child". I got Raynie, a samoyed, just a week before I got married (Brandon got two in one!) and she was our constant companion for over ten years before she passed.  It's a little sad remembering, but so joyful. I am ready to finally delve into that stack of photos and tell her story. I hope you love her as much as we do. Have a very Happy New Year!

Warm wishes,


Thursday, December 6, 2012

Family Game Night | Studio J

Winter sets in, the nights get colder. The kids get bolder... unless you break out some board games! The wind is whistlin' and the snow, it is a flyin'. It's time to start one of our winter traditions again! This super easy scrapbook layout from Studio J can be assembled in 15-30 minutes online in our studio scrappin' suite from Close To My Heart. Kits are predesigned and come as simple or as intermediate as you want, but with drag and drop ease. Give the gift of your family through the year in photos and words as you easily duplicate your pages or albums to share with ALL your loved ones! Schedule some "studio" time with me online via chat to walk you through a layout of your choice. It's free! And most of all, enjoy the season and Merry Christmas!

Warm wishes,

Saturday, November 24, 2012

Small Business Saturday and a Layout {Studio J}

The Mortons in Avonlea, inspired by Karen Pedersen.
Welcome to Small Business Saturday! What is Small Business Saturday? Let Wikipedia enlighten us:
Small Business Saturday is an American shopping holiday held on the Saturday after Thanksgiving during one of the busiest shopping periods of the year. First celebrated on November 27, 2010, it is a counterpart to Black Friday and Cyber Monday, which feature big box retail and e-commerce stores respectively. By contrast, Small Business Saturday encourages holiday shoppers to patronize brick and mortar businesses that are small and local.
I appreciate your patronage this day especially and invite you to stop by my Brick and Mortar for a spell and some great Black Friday fun, still going on through the end of Cyber Monday. Go here to see what exclusive hourly deals I have to offer today in thanks!

Along with Mom & Pop shops, comes Family. This is one of those typical family portraits for photographers. Since we are usually behind the lens, it can be a challenge to get a good shot of your family with you actually in it (the self-timer option is our friend). You're at somebody's wedding (in this case, my niece, Paige's) and the setting is beautiful, so you gather the family and ask someone to take your picture and hope for the best! Will everybody be looking at the camera, did the makeshift photographer frame it up right, are your faces now in shadow? I find these can be very frustrating if you let them. So I don't!

Now, I find they are the best portraits of our family and often reveal the real McCoy (in this case, Garrett). He's such a character! If anyone is going to be doing something off, it will be him. Mind you, he's only three, so it's okay. It reminds me of the many years previous when it was first Brook, then Aidan who gave this photographer grief. I'm learning to let it go, finally, and just enjoy the moments! I hope you have had or will have many moments this weekend as you celebrate within your own friends and family all the wonderful ideas and character that has made this nation great. Give thanks for the American Dream and thanks for stopping by!

Warm wishes,

Tuesday, October 16, 2012

Happy Birthday Mom

Ann, my lovely mother-in-law (and heart!) celebrated an undetermined birthday this past week. The whole family came over and celebrated with a wonderful dinner and cream cheese pie (mmm....piiiiiie.) It was great to get together and see everyone. We try to do so about once a month with Brandon's family, but we're just getting so darn BIG, I'm not sure how long it will continue. Best to relish it while it does!

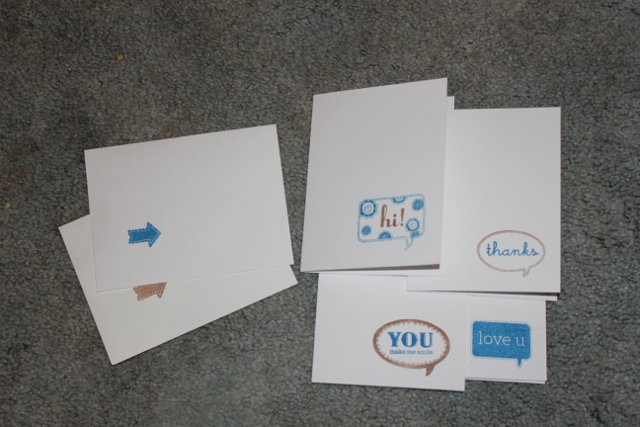
The stamp set is from the Cricut Artiste collection (it comes with THREE D-size stamp sets, and 3 sheets of chipboard dimensional elements). I loved the simplicity of the word blurbs and know Ann just loves simple, fun cards. I knew this set would be a winner for a quick gift of everyday greetings stamped in Dutch Blue (retired) and chocolate. Top it off with a pretty ribbon and it makes a beautiful presentation to someone you love.

Warm wishes,

LinkWithin

Related Posts with Thumbnails