Showing posts with label Techniques. Show all posts

Friday, May 17, 2013

You're Invited to a Pajama Party with Close To My Heart!


Close To My Heart is teaming up with Big Picture Classes to bring you a live webcast with step-by-step instructions for making this Happy Thoughts kraft container. The FREE webcast will air Thursday, May 30 from 7:00 pm to 8:00 pm (MDT). During the presentation, you’ll learn to make several projects from a variety of sponsors, including Close To My Heart’s Happy Thoughts kraft container, as the presenter walks you through the steps. Watch the Pajama Party by yourself, with other friends and Consultants for a fun crafting pajama party. Anyone with an Internet connection can watch, so be sure to order your project supplies in advance and then tune in!

The Pajama Party class will be available for FREE at BigPictureClasses.com on May 30. If you would like to interact on the message board, participate in live chat, post to the gallery, download handouts, or enter any contests, you will need to log in to the Pajama Party “classroom” by creating a free account on the Big Picture Classes website.

To make our Happy Thoughts kraft container, you will want to have the following items—or similar products—on hand:
  • My Acrylix® Frame Flair Stamp Set (D1546)
  • My Acrylix® Happy Thoughts Stamp Set (C1536)
  • Chantilly Paper Packet (need 1 sheet of B&T, X7163B)
  • Crème Brulee Cardstock (need 1 sheet, X5754)
  • Lagoon Cardstock (need 1 sheet, X5762)
  • White Daisy Cardstock (need 1 sheet, 1385)
  • Whisper Cardstock (need 1 sheet, X5929)
  • Whisper Exclusive Inks® Pad (Z2172)
  • Lagoon Exclusive Inks® Pad (Z2195)
  • My Creations® Kraft Container (Z1833)
  • Baker’s Twine Neutral Assortment (need 3 yards, Z1701)
  • Color-Ready Trinkets Wooden Shapes (Z1844)
  • Sparkles Black & Grey Assortment (Z1754)
  • 3-D Foam Tape (Z1151)
  • Micro-Tip Scissors (Z534)
  • Corner Rounder (Z578)
  • Paper Trimmer (Z1783)
  • My Acrylix® Spritz Cleaner (1778)
  • My Acrylix® Stamp Scrubber (Z1782)
  • 2" × 3½" My Acrylix® Block (Y1009)
  • 4" × 5" My Acrylix® Block (Y1012)
  • Cricut® Art Philosophy Collection (Z1686)
Share this with your pals and just go to my website and click shop (pajamas optional!)


Monday, May 13, 2013

Morton Update | Mother's Day Card

First, thanks for staying with me the past few years, and following my blog! We've been mighty hectic around here (really, since Colt was born) and I've had a hard time setting things down and crafting, let alone sharing any of it.

Here's what you'll find, today:
1. Mother's Day
2. Morton Update
3. Mom's Card - tutorial

1. Mother's Day
I'm kind of proud of myself. I'll tell you why in a sec. For Mother's Day, my family really gave me the royal treatment! I got to prop my feet up while they cleaned the whole house top to bottom (waxed floors and polished the wood railings, even!) I received chocolate, handmade gifts, and a wonderful home-cooked meal and I didn't have to do the dishes! While they worked like slaves, I used my time wisely. This is the proud part. I got a rare opportunity to craft for several hours while they cleaned and cooked. I was able to accomplish quite a bit during that short time and crafted some last minute gifts for others. I'll share one with you today, and yippee! I have a few more to share this month, too. I hope you had an amazing Mother's Day with your friends and family as well!


2. Morton Update
Before I go on about my cute little family, I want to remind you that during May, with your $35 purchase, you can still pick up a Dream Pop paper packet for National Scrapbooking Month for only $10. It's super cute and fun and just right to perk up your day! Pick it up here. Okay, now on to the fun stuff! We just returned home from four-wheeling in Delta, UT. Delta, you say? Yes, I was a bit skeptical as well, but, turns out, Delta has some really interesting sites and we had a great time. If you're from Delta, I commend you on your beautiful town and hospitality! Some of the places we saw:

Topaz Japanese Relocation Camp
Notch Peak
Painter Springs


Hermit's cabin

Lehman Caves
Brandon and I have been just plugging along and the vacation was much overdue. It was great to get out of the valley and roast s'mores with family and friends! The kids are all doing well, looking forward to summer. We got a tramp recently, so they've been enjoying their status as VIPs in the neighborhood :)

3. Mom's Card (one of them - Moms, that is)
This was a bit unconventional for a Mother's Day card. I had been cutting earlier for a project later this week for Moms and daughters at my church and became fascinated by the negative space created from the items cut out on my Cricut. I kept thinking, this would make a fabulous card in Slate and Honey! So this is what developed. I loved spending time just puttering around on the Cricut. Just seeing what inspiration came and following through; putting several projects together. Priceless. Thank you family.

This 6x6" card features a Slate base and 3 layers of Honey cardstock over the top, black 1" grosgrain ribbon and 2 Ruby cardstock roses, inked with Slate. Below is a quick tutorial on how I got the pattern.

1. I had 3 sheets of negatives left from cutting pinwheels out of Honey cardstock. The pinwheels were cut using the Close To My Heart Artiste cartridge (pg. 50, "p" key using Accent 1) sized at 3 1/4" and the Auto Fill feature, which produced 9 per sheet.
2. Flip the bottom diagonally, from the top right corner to the bottom left corner, keeping the top left corner where the pattern is closest to both edges.
 3. Ok, set the top sheet off to the side, keeping track of how you set it. Take the middle sheet and rotate a quarter turn to the right.
4. Now, hold up that third top sheet which you set aside and rotate that one a half turn to the right. And there's your pattern.
 5. Ok, now to tack them together quick-and-easy-like, grab your favorite spray adhesive. This is from Wally's. And something to use as a drop cloth. The lid of a paper box works great in keeping overspray to a minimum while fitting a full 12x12" sheet.
6. Now, separate the layers, keeping the positioning, and spray the backs of the cardstock sheets (so your adhesive doesn't show through if you miss), one at a time and carefully re-stack the sheets and press together to secure. Now you have your overlay for your card. It's still tacky on the bottom due to the previous spray adhesive, so just center over your card base where you like and press down, then trim.

7. Attach ribbon and then roses, which were also cut from the Artiste cartridge (pg. 54, "f" key using Accent 1, at 5" and 3"). Tip, use this handy tool to form your roses and zip these out in record time.

Warm wishes for a great spring day!


Monday, December 31, 2012

Christmas Firsts | Overstamping Technique


Phew! I am grateful to be back in the blogosphere after a wonderful Christmas holiday with my family. It's been a crazy whirlwind and as usual I overbooked myself on too many projects and didn't get half of them finished...and enjoyed every minute with my family doing what we loved. I can live with that.

Here's a look at one project I was able to finish this week. It took me all week, because despite the Cricut being super fast and easy, it is kind of loud next to the sleeping baby's room... I get my crafting done after the kids are down for the count at night, so I have to pre-plan my Cricut cutting times so I can do those on the weekend during the day. When I just sit down to mess around and inspiration strikes...well, it sometimes takes a while to try it all out!

Title using the Overstamping technique in Champagne and Cranberry inks. Love this.
Overstamping

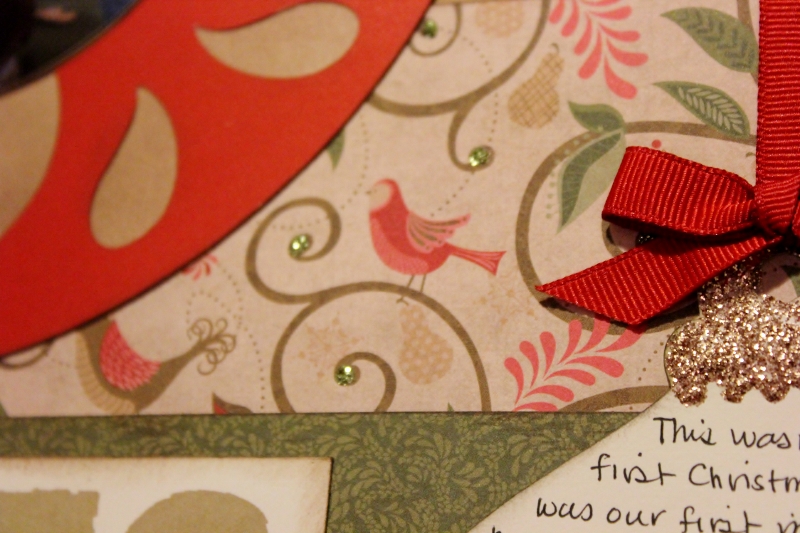
All of the ornaments were cut with the Cricut Artiste cartridge. For the large Cranberry ornament, I cut the base in Champagne cardstock at 8" and then the overlay in cranberry, also at 8", matching the layout instructions in Jeanette Lynton's Magic for the Makin' It Happen layout. The ornament for my journalling was cut from Colonial White cardstock, then I embellished with Almond Glitz Gel, letting it dry a few minutes, then added journalling and some old Cranberry grosgrain for trim. I love how the Almond and Bronze glitter appears to change colors based on what is around it. The glitter on the large Cranberry ornament and the Colonial White journal spot are the same, but they appear different on the two colors of cardstock.
Journalling Spot Detail

Green, Red and Almond decorative Glitz Glitter Gel detail.
Just loving this Glitz Glitter Gel! I added dots of Green all over the swirls on the Pear and Partridge B&T. It's Christmas!
The blur of white behind the shoe in the first picture on the Cranberry ornament is a bit unusual, I realize. It was long before I worried much about taking pictures with scrapbook layouts in mind. Meet Raynie. This is the first layout I have done of her since she passed, my sweet baby girl and first "child". I got Raynie, a samoyed, just a week before I got married (Brandon got two in one!) and she was our constant companion for over ten years before she passed.  It's a little sad remembering, but so joyful. I am ready to finally delve into that stack of photos and tell her story. I hope you love her as much as we do. Have a very Happy New Year!

Warm wishes,


Tuesday, November 13, 2012

Thinkin' Inkin'? Pigment vs Dye


Not sure when to use what? Here's a great short video on the benefits of both types of ink when it's best to use each.
Warm wishes,
Trish
Published with Blogger-droid v2.0.6

Tuesday, August 21, 2012

Paige's Card {Bridal Shower}

Paige's Bridal Shower card, featuring Avonlea,
Baroque Borders and It's Your Day

I was priviledged to go to my niece, Paige's, bridal shower this past weekend and spend some time with the girls "showering" her with gifts and best wishes. My sister-in-law and her girls threw a fantastic party and my mom and I had a great time, though we missed having my sister there (she's in California). We gave Paige, Zac and Berklee a silverware set and then a separate laundry basket with lots of kitchen gadgets thrown in so I made her two cards; one for each gift. I haven't spent much craft time lately and it felt great to get out the ol' Tombow and paper trimmer!
Close up of the embossing detail

This card features our new Close To My Heart Avonlea papers and both the August Stamp of the Month (Baroque Borders) and the National Stamping Month Campaign (It's Your Day) stamp sets. The pattern is featured in Jeanette Lynton's new pattern publication, Make It from Your Heart. I cut the dress form and pattern from Cricut Artiste and then stamped Baroque Borders over the dress and heat embossed with a mix of white embossing powder and silver glitter (I love this custom mix!) to make the lace on the "wedding dress". Ink a Just Blooms Paper Flower with Smokey Plum and add a silver pearl from the Licorice Opaque collection to the center. Then I added a little Liquid Glass to the back and front of the burlap ribbon to hold it firmly in place on the card and make sure my dress form stayed where I put it. There was enough loft from the ribbon to "pop" the dress off the card base without adding any 3D Foam Tape, but I did use it under the sentiment to make it stand out. Super simple and easy, but it packs a lot of PUNCH!
Baroque Borders, August Stamp of the Month
The Stamp of the Month is only available through the end of the month at only FIVE BUCKS! It's exclusive and that means it goes away at the end of the month, so get it quick! You can get this set with any order totaling $50, including your Play Date purchases! And if you think that's hot, read a little more...
The double stamp set, It's Your Day, with almost 50 stamps,
is available now for National Stamping Month in September.

National Stamping Month is in September every year, and Close To My Heart throws a great celebration each year with an over-the-top giftie! This set is perfect for Project Life or any of your 12/365 scrapbook projects. You can get this early, from now until the end of September with any purchase totaling only $35! And guess what? You can combine these deals and get BOTH with your $50 order for only $10 more!! So if you got Cricut Artiste and, say, a new alcohol marker set, you could get two Stamps of the Month and two It's Your Day sets! The good times just keep rollin'!

Amazing things are afoot, here. You can see the other card I made for the second gift tomorrow on the blog, so come on back. In the meantime, stay safe and look for the Silver Lining!


Saturday, October 22, 2011

Cute Pumpkin Card and Video

Here's a cute video to help you get started on your Halloween or Thanksgiving cards. It's short and sweet and explains the Base and Shade stamping technique. Enjoy!


Warm wishes,

Saturday, July 2, 2011

Bella Bliss!


Snuck in a layout this afternoon while the youngest was taking a much needed nap before the festivities tonight.

I used Bliss and added some Vanilla Cream cardstock for the scalloped trim and main photo mat. The base Colonial White is spritzed with some homemade shimmer spray in the spray pen - fill to the second to top line with water then add a dab of Create-A-Shade pearl paint and 5 drops of Chocolate reinker. It gives a great sparkle to the page and ties in the paper with the gray butterflies which features a light chocolate sponge effect that looks almost Smoothie. Hence the Smoothie flowers! The blue butterflies are 1st and 2nd generation stamped in Indian Corn Blue. These are from My Acrylix Trellis which I bought just for this layout after I couldn't find a suitible flower in my stash #thethingsidoforscrapbooking!

Hope you are having a great Independence Day weekend! I can't wait to break out the tripod tonight for fireworks!

Warm wishes,

Trish
Published with Blogger-droid v1.6.6

Friday, May 20, 2011

Celebrate U Card


This is a card we made a few years ago that was one of my favorites. I haven't put it up on the blog before, so I thought I would share it with you. It was made with That's Amore papers and Damask Tiles. I'm so glad so many of you liked it! I have received it back a few times from friends and family. It's great to see you are sending your cards out to those you love! Designer's Tip: Use a little Liquid glass over the small tiles to make them pop and add dimension!

Happy Crafting!

Published with Blogger-droid v1.6.6

Monday, May 9, 2011

Scalloped Flower Card


Hope everyone had a great Mother's Day and spent it with people you love. I had to work yesterday morning, but when I got home, I had two eager kids bearing gifts! They could hardly wait until I got in the door! Both Brook and Aidan had made gifts at school and decorated their own cards and artwork to give. Garrett, he was just happy to see "Mama!"

Brandon cooked me lasagna and we visited my Mom, where Dad treated us to strawberry cheesecake - my favorite! All in all, pretty great day. I didn't quite get the nap, but I didn't have to cook, dang it!

Here's another inspiration from Jeanette's blog. The pattern is from Wishes card confidence program and features papers from Dream Big. I random stamped the white daisy cardstock in Lilac Mist with a small snowflake swirly from my favorite snowman set to coordinate with the swirl pattern on the flowers. The large flower is made from 4 2" scallop circle punches. The petals are hand-cut. On the small flower, I used 2 scallop punches but trimmed the size down with scallop edged scissors and then added petals. The cute flower brads are from our White Daisy Mini Medley collection which is currently 33% off on my website and only $4 while supplies last!

Published with Blogger-droid v1.6.6

Tuesday, April 19, 2011

April 5 for $5 Card Class Instructions

Hey ladies! Thanks for your patience in getting these pictures and instructions up! We had a great class with some fun new ladies this month! Be sure to bring a new pal next class so you can pick a prize out of my goodie basket (valued up to $34.95!!) Kari, Anja and Becky all got to pick prizes this month! On to the fun!
This first card pictured is from the Miracle kit, which we also worked with during Play Dates. Featured stamp set is Fill in the Blank. The clouds are stamped using the flower stamp. Remember with our My Acrylix stamps you can position them on the block any way you want and they just spring back to their original form when you pull them off! So smush some clouds, baby! The butterflies are adhered only in the center to lift the wings up a bit as if in flight. Edges are distressed with Desert Sand using the Direct to Paper technique - just rub the ink pad along the edge for as bold and edge as you wish! The words on your Sweet Leaf piece are barely inked to give it a sponged effect. Remember to click on the picture to zoom in to see detail!

Anj requested this one because she LOVES buttons! Using Salutations Seals, we stamped the Buttercup piece then the White Daisy piece with the same stamp. Using the Circle Punch, punch your buttercup piece around the stamp and then using Micro Tip scissors, trim around the edge of the stamped image on the White Daisy piece. Adhere the white over the buttercup using the stamped image as a guide and set aside. Dry emboss the front of the hollyhock base every 1/2 inch, making sure the raised image is facing out from the front. You can do this by running your stylus down the groove in your paper trimmer - make sure the face is down. Then lightly sand the surface to expose the white core. Adhere as shown.


Over The Rainbow is such a fun, cheerful set. This is my dark twisted spin! Lol! Cut out the center, black rainbow band and adhere in the space between the two Pansy Purple bands. Then trim around the whole image. Cut out the cloud and cut down the center. I sponged the edges in Pansy Purple, also. Cut out the tags, "Somewhere" and "Over the" and Direct to Paper distress with Pansy Purple. In this image, the letters for "hill" are from the Lots of Dots Irresistibles cardstock adhesive-backed alphabet. For your kit, I just Cricut cut the letters in Pansy Purple to keep the cost for the kit at $5. You could achieve a similar result by stamping in White Daisy pigment ink and/or embossing with White Daisy embossing powder.
This is on a Desert Sand base and most if it is done for you! Cut out the red lantern and adhere with some 3D Foam Tape and the hanging "strings" with a Chocolate, Desert Sand or Black marker. This was inspired by Vicki Wizniuk's art.
This 5 inch square card is from the Hope For Japan set, available now until April 30th. It's discounted at only $5 for this A-size stamp set and all profits go directly to the American Red Cross and their efforts in Japan. Papers are a retired paper kit, That's Amore, plus Black and Colonial White Cardstock. The central image is stamped twice. Once on the main square pieced and once more on a scrap, then punched with our 2" Scallop Circle Punch. After sponging the edges of the scallop in black, the image is overlaid to match the image below with a little 3D Foam Tape. Card design by Karen Pedersen - yet another wonderful reason for becoming a Consultant on my team!

Thanks so much for stopping by! My next 5 for $5 card class is the first Thursday of the month, on May 5th at 630 pm. Let me know if you would like to attend or would like to purchase a kit.

Warm wishes,

Friday, February 11, 2011

Lisa’s Creative Corner: A New Use for Acrylic Blocks

I ran across Lisa Stenz's new video on shadow stamping with your acrylic blocks. I am SO doing this for my next Valentine!
Lisa’s Creative Corner: A New Use for Acrylic Blocks: "Want a new way to use your acrylic blocks? Check out my latest video on using your blocks as background stamps..."

Warm wishes,

Thursday, February 10, 2011

Ribbon Video Tutorial

The Close To My Heart Art Department has created this video featuring some great ideas with our new Designer Ribbon in Pink. This is FABULOUS! The 3D Ribbon has so many possibilities - and it's PINK! What could be cooler? Purple, maybe. But let us not get ahead of ourselves. Check this out:


Stay tuned for my very own Broach design. These are so HOT right now! You'll be unable to resist the temptation! In the meantime:

Supplies are listed below. You can order here.
Pink Collection Designer Ribbon - Z1384
Pearl Opaques - Z1336
Glitter Glue - Z1313
Sweetheart Level 2 Paper Pack - X7134B

Monday, February 7, 2011

Countdown to Valentine's Day #7

Welcome Hoppers!
LOTS of techniques in this post!

We're halfway there! It's Day number 7 in the Countdown to Valentine's Day Blog Hop. There has been some STUNNING artwork this past week. I can't imagine what is waiting for us in the coming week! I've seen so many great ideas with this hop - I'm never going to get to them all, but I'm sure gonna try!

Today's artwork is from the class I went to last Friday by fellow consultant and best crafty pal, Yvonne Wickham. She got me into LOVING Close To My Heart and has recently come back into the fold after taking time out to have a baby and focus on her beautiful family!

SHE calls it a simple card class - I call it Techniques 301! We played around with several different skills and had a beautiful canvas to work with - the new Sweetheart My Reflections paper pack. They all turned out amazing - despite my ineptitude, lol! Thanks for inviting me, Yvonne!


 Liquid Applique
Okay, liquid applique is a great product we sell. It comes in a small tube and you use it like a pen. Simply draw where you want the design to go, heat emboss and Poof (puff?)! It goes on really thick and it expands 2 to 3 times its original size. It's just great for sheep, clouds, Santa and butterfly bodies. Oh, and flower stems, and ... Well, you get the idea. Anything to puff out a bit.

Reflection Stamping
Just like the name implies you stamp a reflection of it by using a brayer. Ink your stamp and stamp directly onto the brayer roll. Now you're going to line it up and roll the brayer to drop the inked image onto the paper. In this case, we inked a single heart for each butterfly wing. If you were to just stamp it on either side with the bumps on the heart out you'd have the "Egyptian Effect" as Yvonne calls it - one up and one down. Now to get the other side, you want to Second Generation stamp, by inking, then stamping off, then stamp right onto your art. The brayer acts as a Second Generation stamp and does remove some ink in the process. So to even them up and make the coloring uniform, you stamp off first on the regular non-brayered image. This works great with mountains and a lake or mirror scenes, too!
 Spray Pen
 This is a fabulous new tool which debuted in January Inspirations. You fill the body of the pen with about 7 drops of re-inker then top off with water (about an ounce total) then spray on your art! Simple! The closer to the art, the more full, solid coverage. This would work great if you ran out of cardstock for a project! On the middle square here, I was about 7 inches away from it to get the splotchy effect. Below, on the white candy hearts over the cotton candy circle, you can see the ink on the circle is pretty solid. That was about 3 inches away and a few sprays. You'll want to wash the spray pen thoroughly in warm water after each use to prevent clogging and bleeding - especially if you add in pearl paint.


Rock n Roll Stamping
 One of my FAVORITE techniques! This is done by first inking the image up, then stamp off the paper (onto scratch) to achieve a Second Generation impression. Before you stamp your project, you're going to take your inked stamp and roll only the outside edges in fresh ink. This will give you a dark outside "border" and a lighter center. This works best if you have the smallest block size possible for the stamp so you can better control how much ink and where it gets put on the rock and roll. It really gives you a depth to your stamps previously missing. To see a variation, look here.

Heat EmbossingThe white heart is embossed using a craft dryer, tweezers and White Detail embossing powder. Ink your image in Versamark Watermark ink and stamp. Then sprinkle embossing powder over the image and shake off excess into your craft tray. Using your tweezers (so you don't burn your widdle fingers!) hold the paper 3-4 inches from the dryer and dry until you see the image change from dry matte to shiny plastic. (You CAN over do it and burn your project so be careful!)

Masking
The "Love" tag is stamped with a word stamp that actually says, "I Love You." To only get the one word, use a post it note and cover up the "You" portion of your stamp. Now ink it, but leave the "I" un-inked. It doesn't matter if you ink up your post-it note. That's what it's there for! Now remove the post-it and stamp. Voila!

Masking of a Different Sort with the Spray Pen
When you have an image that is trimmed fairly close to the original design, you can put that item down on your paper, spray over it, then remove and clean the stamp. Now mount the stamp on your clear block and stamp the image in the white space left.
Pinwheel Flowers
Yvonne came up with a simpler way to do these flowers. Rather than four squares the size of the flower you want, she took a 12" long strip of B&T in the width of the radius. After accordion folding the strip, attach the two ends together. Then lay flat, positioned where you want it and add a dab of hot glue or Liquid Glass to the center. Add your grommet and squish in the circle to the center a bit to grab the glue and hold until set.


Box Pleats
The pleats are formed by folding a long strip of paper Up Down Down Up Up Down Down, etc. The UP is toward you and DOWN is away from you. Some people score them every half and quarter inch. I prefer them just a bit messy! This card took 2 2-1/2" x 11" strips, adhered together. I started in the middle over the seam to 'cover' it with the folds and worked out in either direction.
 Random Stamping
The pleats are white printer paper random stamped with Tulip hearts and then spray penned with a cotton candy re-inker and water mixture.

Sponging
The white paper flower is sponged with cotton candy ink to give it a little pop! All edges in all the cards are sponged in Tulip ink also.


Pleats
The cotton candy flower strip is folded back and forth to create a series of pleats. You want to fold a long and a short. Fold Down first, then a quick Up. Then go longer past the first fold before folding Down - so the pleats are staggered, rather than a flat accordion fold with everything the same size.

"Love" and the scroll are from the Bohemian alphabet. Both are Heat Embossed in Detail White powder as described above.
Whew! That's a lot of new techniques! Thanks for sticking with me and check out this fabulous art from my fellow consultants on the Countdown to Valentine's Day Blog Hop!

Warm wishes,

Published with Blogger-droid v1.6.6

LinkWithin

Related Posts with Thumbnails