Saturday, April 13, 2013

Happy Mail | Everyday Cards Class


I was privileged to get some love in my mailbox from my neighbor. She felt bad she missed my birthday, so she brought me a cute little gift of gum for a "fresh start"! I love getting happy mail!
Have you sent out a handmade card to someone you love? It's a small and simple thing by which great things are accomplished.

Short on cards? Join my Everyday Cards class Tuesday, April 23 from 630 - 830pm. Every month we will make an average of 4 cards and/or gifties to build up your stash. Thank you's, Happy Birthdays, seasonal and neighbor gifts  - it's all here, with a little tips, tricks and Cricut fun, too. Sign up today and bring a friend for double the fun! Class is $10 or cards are free with your $25 order of Close To My Heart products.

All classes held in South Jordan, address and directions given at sign up. Call or text 8019108698 or email slvrlinin@live.com. Can't get to South Jordan? No sweat - you can participate at home via mail! Just add $5 to ship your kit to you and pay by PayPal. Enjoy your day!

Warm wishes,

Published with Blogger-droid v2.0.10

Thursday, April 4, 2013

April Specials and Signup Bonus!

Artwork by Karen Pedersen
Here's what you'll find in today's post:
1.  Sign Up and Celebrate!
2.  April Stamp of the Month:"My Sunshine"
--------------
1. Sign Up and Celebrate:  April is the month to sign up as a new consultant with Close To My Heart.  When you do, you get The April, May, June and July Stamp of the Month sets FREE with your kit. Each stamp set is valued at $17.95, which means that the 4 together are worth $71.80.


You qualify for this special whether you choose the Essentials Kit ($49, valued at $155) of the Master Kit ($99, valued at $335).  You don't have to be a math whiz to see the HUGE savings in that!  In fact, if you were to sign up with the Essentials Kit, you would spend $49 to sign up and receive over $226 in products with this special. If you were to sign up with the Master Kit, your $99 would get you over $406.  To sign up, just go here and it's easy, peasy, lemon squeasy. Once you sign up, I will be notified and will contact you to help you get your business started. For your convenience, here are the photos and lists of contents in both the Essentials and Master Kits.Essentials Kit: $49 ($155 in retail value):  Includes a Read Me First Letter, Current Idea Books (qty. 3), Hostess Order Forms (qty. 5), Customer Order Forms (qty. 5), Close To My Heart Color Swatches, Spring/Summer 2013 B&T Sampler, Petite Perks Critter Expressions Incentive Stamp Set, Chantilly Complements Dimensional Elements, Workshops on the Go Chantilly Scrapbooking Kit, Reflections Scrapbook Program, Originals Card Confidence  Program, Buttercup Exclusive Inks Pad, Cotton Candy Exclusive Inks Pad, Spinner, My Acrylix Wheel of Life Stamp Set, My Acrylix For a Friend Stamp Set, 4" x 5" My Acrylix Block.
------------

Master Kit: $99 ($335 in retail value): Includes Read Me First Letter, Current Idea Books (qty. 10), 5 Studio J Layouts (redeem within 3 months), Hostess Order Forms (qty. 25), Customer Order Forms (qty. 25), Spring/Summer 2013 Gathering Postcards, Close To My Heart Color Swatches, Spring/Summer 2013 B&T Duos Sampler , Petite Perks Critter Expressions Incentive Stamp Set (qty. 5), My Creations 6" x 6" Canvas Display, Spinner, Chantilly Complements Dimensional Elements, Workshops on the Go Chantilly Scrapbooking Kit, My Creations Star, Color Ready Seam Binding Ribbon, Reflections Scrapbook Program, Originals Card Confidence Program, Cello Bags, My Acrylix Stamp Scrubber, My Acrylix Spritz Cleaner Bonding Memories Glue, Sponge, Liquid Glass, Non-stick Micro-tip Scissors, Buttercup Exclusive Inks Pad, Cotton Candy Exclusive Inks Pad, My Acrylix Glamour Uppercase Stamp Set, My Acrylix Wheel of Life Stamp Set, My Acrylix For a Friend Stamp Set, 4" x 5" My Acrylix Block, 3" x 3" My Acrylix Block.
You can read more about the kit and contents on my team page here.
-----------

2.  April Stamp of the Month: This fun and sunny stamp set is perfect for both cards, layouts, and even some fun Summer home decor projects!  From sunshine to a bird and even a hot air balloon, these fun, footloose and fancy free images are sure to tickle your fancy! They have been tickling mine for over a week as I have played with this set. I'll be sharing some of my artwork with you throughout the month.  The only hard thing was putting this set away and moving on to something else!  I made the card you see at the top of the post with the April Stamp of the Month. I used my very favorite image in the set, the sunshine.  The cute sentiment, "Sun is shining. Weather is sweet. Make you wanna move your dancing feet. -Bob Marley" was perfect for the inside of my card. This set (retail value of $17.95) can be yours during April only for $5 with every $50 order.  Hop on over to my website and you'll be prompted to add this set before you check out.
Close up of April Stamp of the Month card. Notice the embossed center of the sun and the sponging around the edge detail.

April Stamp of the Month: "My Sunshine".  Carrier sheet actual size is 6" x 6".  I suggest purchasing the 4" x 5" My Acrylix Block for this set.
Instructions to make this card:Supplies Needed: April Stamp of the Month, White Daisy Value Pack Cards and Envelopes, White Daisy Cardstock, Tommy Paper Pack, Honey Stamp Pad, Versamark Stamp Pad, White Daisy Embossing Powder, Heat Gun, Outdoor Denim Chevron Ribbon,Colonial White Waxy Flax, Red Button Assortment, Round Sponge, 3D Foam Tape, Glue Dots, General Adhesive of your choice (I love Tombow).1.  Stamp the sun rays in Honey Ink on a 3 1/4" x 3 1/4" piece of White Daisy Cardstock. Sponge the edges of this square with Honey Ink. 2.  Cut a 2 1/2" circle from Honey Cardstock.  Stamp the sun words in the center of this circle with the Versamark Pad.  Sprinkle White Daisy Embossing Powder over the top and pour excess back in jar.  Heat with the Heat Gun until the powder and ink melt together to form an embossed image.  Set aside to let dry/cool for about 1 minute. 3.  Sponge the edge of the circle with Honey Ink. 4.  Mount the circle in the center of the sun rays image using 3D Foam Tape.5. Mount this square on a 3 1/2" x 3 1/2" piece of Outdoor Denim Cardstock.6. Cut a 4" x 5 1/4" piece of the diagonal stripe B&T paper.  Mount this centered on the card front.7. Mount your focal image as you see in the photo near the top of the card using 3D Foam Tape. 8. Form a bow with the Outdoor Denim Chevron Ribbon.  Adhere it below your focal image with a glue dot. 9. Thread a piece of Colonial White Waxy Flax through the red button of your choice and tie in a knot. Using a Glue Dot, secure your button to the center of your bow . 10.  Stamp the "Sun is shining..." image in Honey Ink on the inside of your card.

Monday, April 1, 2013

Now is the Time

..to sign up to be a Close To My Heart Independent Consultant! If you've been sitting on the fence, April is your month with our great recruiting special.

When you sign up as a Consultant in April, you’ll receive a little something extra for joining the Close To My Heart family — the April, May, June, and July Stamp of the Month stamp sets for free! These D-size stamp sets are a great for a new Consultant to create artwork, bring to Gatherings, and show off to everyone. Now that’s a reason to celebrate! To learn more about being a valued member of my team, go to http://trishamorton.ctmh.com and click on Opportunity.

Warm wishes,


Published with Blogger-droid v2.0.10

Thursday, February 28, 2013

Love Your Layout | Studio J

Hello! The February Love Your Layout video is up and it's a great one, featuring Later Sk8r, which is All. Boy. As always, besides the beautiful artwork and ideas, there is step-by-step instruction on how to recreate this layout for your very own. And you always learn a new technique or two in the process! So go on. Love Your Layout.

Gnarly Layouts in Studio J®

Later, dude! The Later Sk8r kit is featured in this month’s Love Your Layout℠ video, where you can find tips and tricks for creating a gnarly layout. Learn how to create paint-splattered accents, stack My Stickease®images, and add dates to your studio scrapbook pages. Log in to Studio J to make your own layout while you watch the video!


Sunday, February 10, 2013

Become a Close To My Heart Consultant for 49 Bucks!

No, that $49 in the title is not a type-o! It's the real thing!  With a brand new Idea Book (which debuted on Feb. 1) comes an awesome New Consultant Kit, two to be exact.  We have a $49 option (the Essentials Kit) and a $99 kit (the Master Kit).

New Consultant Kits Available:


Essentials Kit ($49 + shipping and tax)


For a little as just $49 (over $155 value), you can get all of the goodies in the photo above and start a new business! 


Master Kit ($99 + shipping and tax)


For $99 (over $335 value), you get everything included in the Essentials Kit (see photo above) plus more supplies and 5 Studio J layouts. 


Click here for more information on joining my team and to see everything that is available in the new kit!


Saturday, February 2, 2013

Super Bowl Specials

This was just the cutest little party decor, I had to share! Check out this site for some quick party ideas! Ok, now on to the deals!

Two choices, here, in no particular order:

Ruby 
Call/Text/Email me your order during the Super Bowl and receive 20% off your purchase!! This is only available through me. Payment can be later in person, Check by Mail or Pay Pal. You can peruse the online catalog page by page, or use the Shopping function to search and sort as quick as a Turn Over at http://trishamorton.ctmh.com

Gypsy
While you're online, head to the website at http;//trishamorton.ctmh.com and click the Super Bowl Mystery Hostess! link on the bottom right side, under Gatherings and shop till you drop during the Super Bowl. Every order will be entered in a random drawing to receive ALL of the Hostess Rewards for the day's orders! Nothing like zinging a Field Goal straight on over!

No matter which team you're for Ruby, Gypsy or Bamboo, everyone makes out like a million bucks during my Super Bowl specials!

Have a great weekend!

Happy February

Yay! The new Idea Book is here! This book is such a breath of fresh air, too. There are so many wonderful new surprises! Come check it out online at http://trishamorton.CTMH.com and if you want a paper copy in your hands, contact me today!

So. Lot going on this month. You can see what's kept me so busy (it's, a small portion of that) by going here, http://mamasalt.blogspot.com (not for the faint of heart, er.. stomach).

Studio J. Have you tried it? You should! During February (now, remember it's a short month) you can get beautiful full-color 12x12 double layouts for only $5 each. That's $1.95 off! And it's a great way to try it out. No downloading, no tech-know-how. Just upload your photos and drag and drop and they're in your hands in a week! Go to my website http://trishamorton.ctmh.com and click Products > Studio J. Simple!

You can also pick up a new Stamp of the Month, Home Sweet Home, and get some new artwork ideas on my site. And all of the next six SOTM's are listed with product lists detailed for the artwork created and fun tips to help you out every day! Give it a whirl. You'll never regret it.

Trish

Published with Blogger-droid v2.0.10

Tuesday, January 8, 2013

December Daily | Days Ten - Thirteen


Day Ten
Still loving the Glitz Glitter Gel! The Christmas light string stamp is from a retired SOTM, Sharing The Magic.
Day Eleven
A glimpse into the design process behind every class. Ribbon is some old Vineyard Berry from a bulk kit a few years ago.


Day Twelve
Building a snowman in the front yard. Stamps are in Cranberry and Sky inks and from a special double stamp set received in September from National Scrapbooking Day.
Day Thirteen
Colt and I watching Frosty come to life. (He was more interested in the camera clicking and beeping.)

Warm wishes,


Published with Blogger-droid v2.0.10

Sunday, January 6, 2013

December Daily 2012 | Day One - Day Nine


One of the projects I worked on this past month (albeit, a bit silently) was a December Daily album, inspired by Ali Edwards. I became aware of this project a few years ago, when I started A Week In The Life, but figured I didn't have time to do such an in-depth project at the time. I was wrong. One of the things I've discovered, is these types of projects can be as involved and extravagant or as simple as you want. Love this! You've heard me say it a million times, as a mom of four I don't have much time. But the memories are so important. Documenting them doesn't have to take a lot of money or time. I challenged myself to use Close To My Heart products and to use up some of my stash. Without further ado, here is the album and the first nine days.

I used a 6x6" Quick Pic album in Olive as my base. I wanted to be able to slap the photos on and quickly journal. Not a lot of muss and fuss on the pages. I want this done. These albums come in two shades and have 8 memory protectors pre-mounted. That obviously wasn't enough to do 25 days plus an intro and/or end page, so I added some 6x6 Flip Flaps to expand the album. In the picture above (sorry, it's not great) at the center of the album, there is a half-inch space where the pages are mounted. I adhered 6 Flip Flaps in the center here, alternating pages spreading out three to the left and then three to the right, so I didn't end up with a "wedge" if they were all facing the same way. These pages are about an eighth of an inch larger than the pre-mounted memory protectors but they line up pretty well, even for an anal-retentive like me. 
Finished mounting.
Stamp the inside of the cover in Slate and Cranberry using Season of Change (retired). Even though this is old (it's still one of my favorites) I thought this scene embodied all of December from the tree, the winter snow and Santa's reindeer.
Another shot of my opening spread. I've always loved vellum so I wanted to do a see-through page, but didn't want to spend oodles of time. This was pretty simple! Cut the vellum to 6x6" and then I stamped in Slate across the middle using my date stamp I got at Walmart. The ornament is from this cute packet of  Dimensional Elements In Color-Holiday. 

I placed a matching ornament on the back. I created my Foundation Pages in Word using a table and just printed them on plain white 20 lb. paper. If you're interested, email me and I'll send it to you. The pages repeat the days up to 25. I originally made 31, but then decided I would just scrapbook those New Year events separately as they seemed to be a separate thing. each page has room for about 3 lines of journalling. Just enough. Yeah, I'm all about faster, simpler, easier the Close To My Heart way! Here are the rest of my pages. Enjoy!

Days Two and Three. Cranberry stitched ribbon is from the Ribbon Round and retired. The banner is hand-cut and hand lettered in red marker.

"Seven-11" (Garrett can't wait to go with Dad each day) is stamped using the Glamour Lowercase Alphabet in Slate and red glitter accents added using Glitz Glitter Gel.

Again, the Glamour Lowercase Alphabet in Cranberry. Love this.

The ribbon is really old (non-ctmh).
I'll have a few more pages up later this week. My schedule at work changed, so I'm all skee-wampus and I'll be offline for a few days. Check back soon!


Warm wishes,


Monday, December 31, 2012

Christmas Firsts | Overstamping Technique


Phew! I am grateful to be back in the blogosphere after a wonderful Christmas holiday with my family. It's been a crazy whirlwind and as usual I overbooked myself on too many projects and didn't get half of them finished...and enjoyed every minute with my family doing what we loved. I can live with that.

Here's a look at one project I was able to finish this week. It took me all week, because despite the Cricut being super fast and easy, it is kind of loud next to the sleeping baby's room... I get my crafting done after the kids are down for the count at night, so I have to pre-plan my Cricut cutting times so I can do those on the weekend during the day. When I just sit down to mess around and inspiration strikes...well, it sometimes takes a while to try it all out!

Title using the Overstamping technique in Champagne and Cranberry inks. Love this.
Overstamping

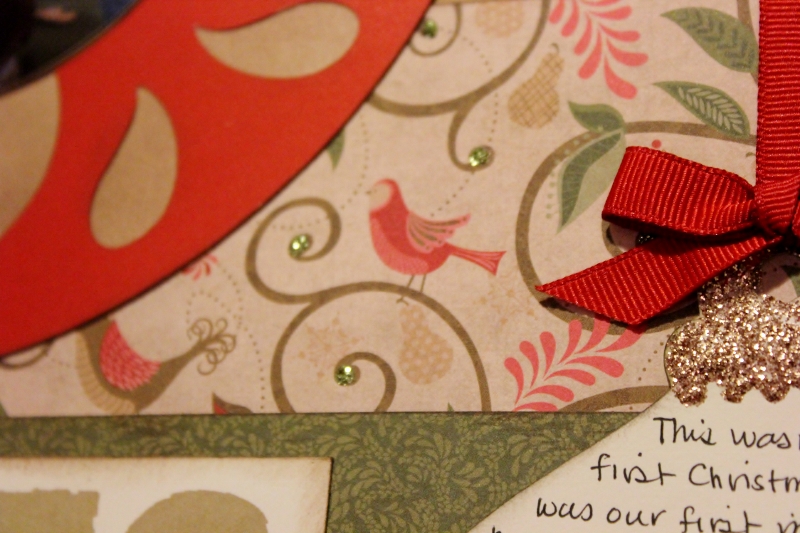
All of the ornaments were cut with the Cricut Artiste cartridge. For the large Cranberry ornament, I cut the base in Champagne cardstock at 8" and then the overlay in cranberry, also at 8", matching the layout instructions in Jeanette Lynton's Magic for the Makin' It Happen layout. The ornament for my journalling was cut from Colonial White cardstock, then I embellished with Almond Glitz Gel, letting it dry a few minutes, then added journalling and some old Cranberry grosgrain for trim. I love how the Almond and Bronze glitter appears to change colors based on what is around it. The glitter on the large Cranberry ornament and the Colonial White journal spot are the same, but they appear different on the two colors of cardstock.
Journalling Spot Detail

Green, Red and Almond decorative Glitz Glitter Gel detail.
Just loving this Glitz Glitter Gel! I added dots of Green all over the swirls on the Pear and Partridge B&T. It's Christmas!
The blur of white behind the shoe in the first picture on the Cranberry ornament is a bit unusual, I realize. It was long before I worried much about taking pictures with scrapbook layouts in mind. Meet Raynie. This is the first layout I have done of her since she passed, my sweet baby girl and first "child". I got Raynie, a samoyed, just a week before I got married (Brandon got two in one!) and she was our constant companion for over ten years before she passed.  It's a little sad remembering, but so joyful. I am ready to finally delve into that stack of photos and tell her story. I hope you love her as much as we do. Have a very Happy New Year!

Warm wishes,


LinkWithin

Related Posts with Thumbnails